Smoother Than Baked: Easy Stovetop Chocolate Pots de Crème Recipe
Imagine a dessert so intensely chocolatey, so utterly silken and rich, it melts in your mouth with an ethereal grace. Now imagine creating it with minimal fuss, no oven required, and certainly no dreaded water bath. Welcome to the world of
chocolate pots de creme stovetop method no water bath – a culinary revelation that delivers pure decadence with surprising simplicity. This guide will walk you through transforming humble ingredients into an exquisite French classic, proving that sometimes, the easiest path leads to the most luxurious destination.
Traditionally, pots de crème are slow-baked in an oven, nestled in a hot water bath (bain-marie) to ensure a gentle, even set. While effective, this method often involves a significant time commitment for baking and an even longer chilling period. For those seeking an equally, if not *more*, sublime result without the logistical dance of an oven and water bath, the stovetop method is a game-changer. It leverages the classic technique of making a crème anglaise – a cooked custard base – and enriches it with high-quality chocolate, resulting in a dessert that's often described as even smoother and more profoundly decadent than its baked counterparts.
Why the Stovetop Method Reigns Supreme: Ditching the Water Bath
The allure of a perfect dessert often comes with the unspoken expectation of complexity. French classics, in particular, can seem intimidating. However, the
chocolate pots de creme stovetop method no water bath defies this perception. Its superiority lies in several key advantages that make it an instant favorite for home cooks and seasoned bakers alike:
*
No Oven Required: Perhaps the most obvious benefit. Freeing yourself from the oven means less planning, less preheating, and a cooler kitchen, especially during warmer months. This makes it a fantastic choice for a quick and creamy dessert, as highlighted in our article,
No-Bake Stovetop Chocolate Pots de Crème: Quick & Creamy.
*
Faster Cooking Time: Instead of 45-60 minutes in the oven, the stovetop custard comes together in a fraction of the time. The cooking process is hands-on but relatively swift, allowing you to move quickly to the chilling phase.
*
Quicker Chill Time: A typical baked pot de crème might need 8 hours or more in the fridge to fully set. With the stovetop version, you're often just an hour away from serving once the custard is made. This makes it an ideal "make just before dinner" dessert.
*
Unparalleled Smoothness: Because the custard is cooked directly over heat and constantly stirred, it develops an incredibly uniform and silky texture. There are no worries about overbaking or a grainy consistency that can sometimes arise from the oven method. The continuous agitation ensures microscopic coagulation of the egg proteins, leading to that coveted velvety mouthfeel.
*
Scalability and Flexibility: Whether you're making a small batch for two or scaling up for a dinner party of twenty, the stovetop method adapts beautifully. It removes the need for multiple baking dishes and complex oven arrangements. Plus, these pots de crème can be made several days in advance and stored in the fridge, maintaining their perfect texture. Our guide,
Ditch the Water Bath: 60-Minute Stovetop Chocolate Pots de Crème, further elaborates on the speed and convenience.
This simplified approach doesn't compromise on quality; in fact, many find the stovetop version to be even more luxurious. It's truly a testament to how traditional techniques can be adapted for modern convenience without sacrificing an ounce of flavor or texture.
Mastering the Stovetop Method: A Step-by-Step Guide
Creating these exquisite chocolate pots de crème on the stove is less about complex maneuvers and more about careful attention to a few key steps. The process essentially involves making a rich crème anglaise base and then swirling in your chosen chocolate.
1.
Prepare Your Egg Base: In a medium-sized bowl, combine your egg yolks with sugar. Whisk them vigorously until the mixture becomes pale in color, significantly lighter, and visibly airy. This aeration is crucial, as it helps to create a stable base for the custard and contributes to the final light, smooth texture. The sugar not only sweetens but also helps to stabilize the egg proteins, preventing them from scrambling when hot liquid is added.
2.
Heat the Dairy: In a medium saucepan, gently heat your milk and heavy cream over medium-low heat. The goal is to bring the mixture to a simmer, or just until small bubbles form around the edges, but *not* to a rolling boil. Overheating the dairy can scorch it or cause it to curdle. A gentle simmer ensures it's hot enough to cook the eggs but not so hot that it instantly scrambles them.
3.
Temper the Eggs – The Crucial Step: This is where attention to detail pays off. Once the cream mixture is hot, slowly, in a thin stream, pour about half of it into your whisked egg and sugar mixture, whisking continuously and vigorously the entire time. Tempering gradually brings the temperature of the egg yolks up, preventing them from scrambling when they meet the full heat of the saucepan. It's a gentle introduction to heat, ensuring a smooth transition.
4.
Cook the Custard: Transfer the tempered egg and dairy mixture back into the saucepan. Return it to low heat and cook, stirring *continuously* with a wooden spoon or heat-proof spatula. This constant stirring is vital to prevent the custard from sticking to the bottom of the pan and ensures even cooking. The custard will gradually thicken. You'll know it's ready when it coats the back of your spoon (the "nappe" test) – meaning if you draw a line with your finger across the spoon, the line holds. This usually takes about 5-10 minutes. Do not let it boil, as this can cause it to curdle. If you see it starting to bubble vigorously, remove it from the heat immediately and whisk constantly.
5.
Incorporate the Chocolate: Once the custard is thickened, remove it from the heat. Immediately add your chopped chocolate (milk, dark, or a blend – the choice is yours!) to the hot custard. Let it sit for a minute or two to melt, then whisk until the chocolate is fully incorporated, and the mixture is smooth and glossy. The residual heat from the custard is perfect for melting the chocolate evenly without risking scorching it.
6.
Strain for Ultimate Silkiness (Optional but Recommended): For the most luxurious, velvety texture, pass the chocolate custard through a fine-mesh sieve into a clean bowl or directly into your serving ramekins or jars. This step catches any small bits of cooked egg or undissolved chocolate, ensuring a perfectly smooth dessert.
7.
Chill and Serve: Divide the warm chocolate mixture evenly among your serving vessels. Cover each tightly with plastic wrap, pressing the wrap directly onto the surface of the custard to prevent a "skin" from forming. Chill in the refrigerator for at least 1 hour, or until fully set. While 1 hour is often sufficient, chilling for longer (e.g., 2-4 hours) can further enhance the texture and deepen the flavors.
Elevating Your Chocolate Pots de Crème: Tips and Enhancements
While the basic
chocolate pots de creme stovetop method no water bath recipe is phenomenal on its own, there are many ways to personalize and enhance your creation:
*
Choose Your Chocolate Wisely: The quality of your chocolate directly impacts the final flavor. Use a good-quality baking chocolate (bars, not chips, which often contain stabilizers that prevent smooth melting). Milk chocolate yields a sweeter, creamier result, while dark chocolate offers a more intense, sophisticated bitterness. Experiment with a blend for your ideal balance.
*
Flavor Infusions: Before heating, steep ingredients like vanilla beans, orange zest, coffee beans, or even a cinnamon stick in your milk and cream for an added layer of flavor. Strain them out before tempering the eggs.
*
Liqueur Love: A splash of Grand Marnier, Kahlúa, or Frangelico added with the chocolate can introduce a delightful complexity. About 1-2 tablespoons per batch is usually sufficient.
*
A Touch of Salt: A pinch of sea salt (fleur de sel) sprinkled on top just before serving can dramatically enhance the chocolate flavor, providing a pleasant contrast.
*
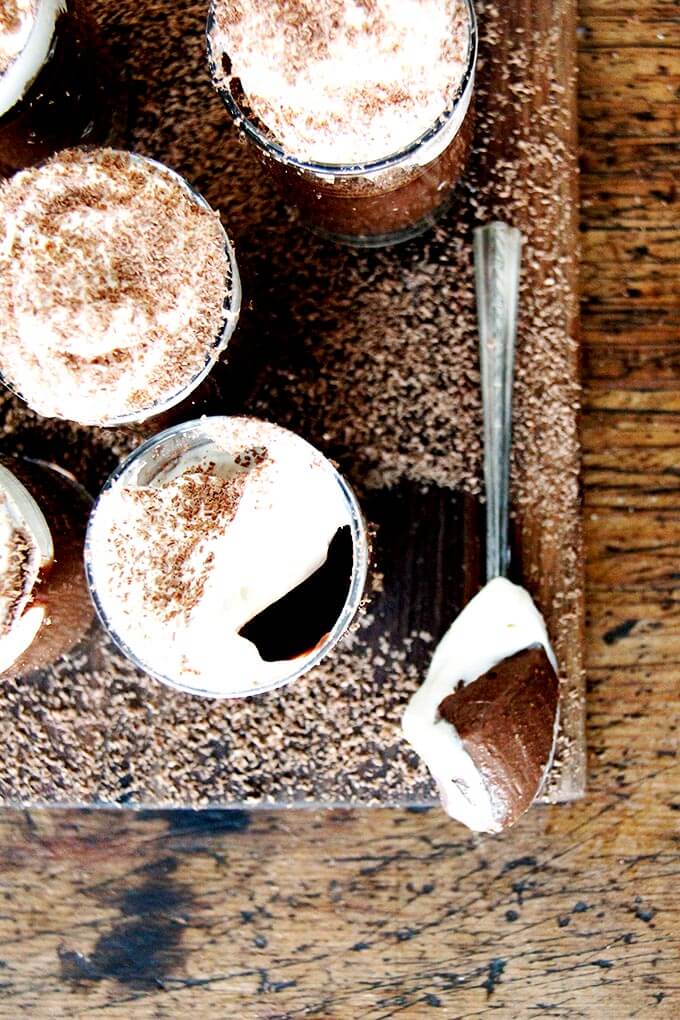
Garnish Goals: Elevate your presentation with simple yet elegant garnishes. Homemade whipped cream (unsweetened or lightly sweetened), fresh berries (raspberries or strawberries are excellent), chocolate shavings, or a dusting of cocoa powder can transform your pots de crème into a showstopper.
*
Portioning: Serve in traditional small ramekins, espresso cups, or elegant shot glasses for a sophisticated touch. The name "pots de crème" literally means "pots of cream," referencing the small jars they are typically served in.
This flexible and delicious dessert is not just a treat for the taste buds but also a testament to efficient and enjoyable cooking.
Conclusion: Indulgence Made Effortless
The journey to an effortlessly elegant dessert often begins with a simple decision: embracing efficiency without sacrificing quality. The
chocolate pots de creme stovetop method no water bath is a prime example of this philosophy in action. It strips away the complexities of traditional baking, offering a quicker, simpler path to a dessert that is astonishingly smooth, rich, and utterly satisfying.
From the rapid creation of the crème anglaise base to the quick hour-long chill, this no-bake approach provides all the indulgence of a gourmet treat with remarkable ease. Whether you're hosting a dinner party and need a make-ahead marvel or simply craving a moment of chocolatey bliss, these stovetop pots de crème will become your go-to recipe. Prepare to delight your senses and impress your guests with a dessert that truly is smoother than baked, proving once and for all that sometimes, the simplest methods yield the most profound pleasures.