Ditch the Water Bath: 60-Minute Stovetop Chocolate Pots de Crème
Imagine a dessert so intensely chocolatey, so unbelievably smooth, it melts on your tongue in a wave of pure indulgence. Now, imagine achieving this sophisticated French classic not with hours of baking and elaborate setups, but in just about 60 minutes, right on your stovetop. Welcome to the revolution of No-Bake Stovetop Chocolate Pots de Crème: Quick & Creamy, where the traditional water bath is happily left behind for a faster, simpler, and arguably even more decadent experience.
For too long, the mere mention of "pots de crème" conjured images of delicate custards baking slowly in a bain-marie, demanding precision and patience. While undoubtedly delicious, this traditional method often meant hours of commitment, from oven time to extended chilling. But what if we told you there’s a secret weapon in your culinary arsenal – the chocolate pots de creme stovetop method no water bath? This technique transforms a once-daunting dessert into an accessible luxury, perfect for last-minute cravings or elegant entertaining.
This article will guide you through the seamless stovetop approach, revealing why it's not just a shortcut, but a superior way to achieve the silkiest, most intensely flavored chocolate pots de crème. Get ready to impress yourself and your guests with a dessert that's rich, creamy, and surprisingly easy to make.
Why the Stovetop Method Reigns Supreme: No Water Bath, No Waiting
The traditional approach to pots de crème involves baking a custard – a delicate mixture of egg yolks, sugar, milk, and cream – in small ramekins placed within a larger pan filled with hot water. This "water bath" (or bain-marie) provides gentle, even heat, preventing the custard from curdling or developing a rubbery texture. While effective, it comes with several logistical challenges:
- Time Commitment: Baking typically takes 45 minutes to an hour, followed by a crucial eight hours or more of chilling to fully set. This requires significant foresight.
- Logistical Hassle: Managing a large pan of hot water in the oven can be cumbersome, prone to spills, and requires careful handling.
- Temperature Control: Achieving the perfect, consistent texture can be tricky, as oven temperatures can fluctuate, impacting the custard's final set.
Enter the chocolate pots de creme stovetop method no water bath, a game-changer that addresses all these pain points. By cooking the custard directly on the stove, much like a crème anglaise, you gain unparalleled control and significantly reduce the overall time investment. Imagine whipping up a batch of these exquisite chocolate pots just before dinner, knowing they'll be perfectly chilled and ready to serve by dessert. This flexibility was a lifesaver for culinary instructors and home cooks alike, eliminating the need for extensive pre-planning.
The beauty of this method lies in its efficiency and consistent results. You're not just saving time; you're often achieving a superior texture. The direct cooking and continuous stirring on the stovetop create a custard that is often Smoother Than Baked: Easy Stovetop Chocolate Pots de Crème Recipe, incredibly uniform, and free from any graininess. Furthermore, the stovetop method is inherently scalable. Whether you're making a small batch for two or a grand dessert for twenty, the process remains straightforward and reliable. Plus, these pots de crème store beautifully in the fridge for several days, making them an ideal make-ahead option for any occasion.
The Magic Behind the 60-Minute Stovetop Method: Crafting the Perfect Crème Anglaise Base
At the heart of the stovetop chocolate pots de crème lies the classic French custard base: crème anglaise. This elegant sauce is traditionally served with fruit or cakes, but by incorporating a generous amount of high-quality chocolate, it transforms into the luscious, spoonable dessert we crave. Here’s how this brilliant method unfolds:
Step 1: Preparing the Egg & Sugar Base
The journey begins by whisking egg yolks with sugar in a medium bowl. This isn't just about combining ingredients; it's about aeration. You'll want to whisk vigorously until the mixture becomes visibly lighter in color and thickens slightly – a technique known as blanchir. This initial step is crucial for incorporating air and ensuring a smooth, emulsified custard later on.
Step 2: Tempering the Eggs with Warm Cream
Meanwhile, in a saucepan, milk and heavy cream are gently heated until hot but not boiling. This is where the magic of tempering comes in. To prevent the egg yolks from scrambling when introduced to the hot liquid, you'll slowly pour a small amount of the hot cream mixture into the whisked egg yolks, whisking continuously. This gradually raises the temperature of the eggs, preparing them for the rest of the hot liquid. Once tempered, the warmed egg mixture can be carefully poured back into the saucepan with the remaining hot cream.
Step 3: Thickening the Custard to Perfection
With the combined custard back on the stovetop, the real cooking begins. Over low heat, you'll cook the mixture, stirring continuously with a wooden spoon or spatula. Patience is key here. The custard will gradually thicken, coating the back of your spoon (this is known as "nappe" consistency). You should be able to draw a clear line across the spoon with your finger. This stage is critical; too much heat, and you risk scrambling the eggs; too little, and it won't thicken properly. The constant stirring ensures even cooking and prevents any part of the custard from sticking or overcooking.
Step 4: The Chocolate Infusion
Once the crème anglaise reaches its ideal thickness, remove it from the heat. This is the moment to introduce your chosen chocolate. Whether you prefer a rich dark chocolate, creamy milk chocolate, or something in between, ensure it's high quality and finely chopped for quick melting. Stir the chocolate into the hot custard until it's completely melted and smoothly incorporated, creating a velvety, intensely chocolatey base. For an extra layer of decadence, consider stirring in a touch of Grand Marnier or a hint of espresso powder.
Step 5: The Final Strain and Quick Chill
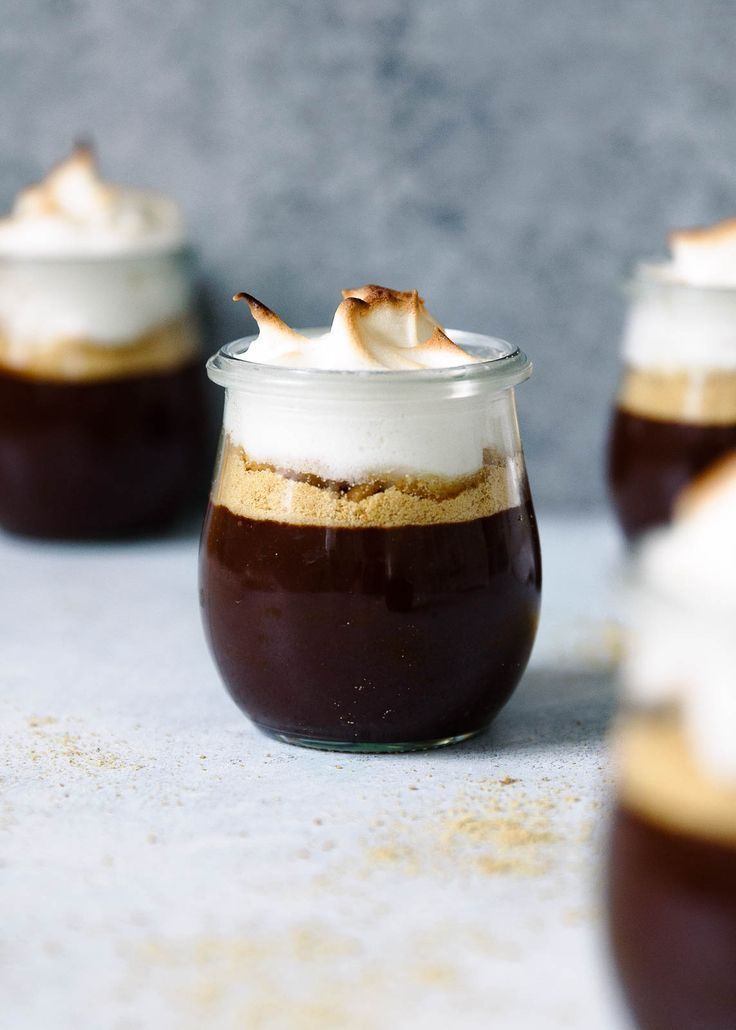
For the ultimate silky texture, pass the chocolate custard through a fine-mesh sieve. This removes any tiny bits of cooked egg or undissolved chocolate, ensuring a luxuriously smooth finish. Pour the strained custard into your chosen serving vessels – small ramekins, shot glasses, or charming little jars, as the name "pots de crème" implies. Now comes the best part: just an hour in the refrigerator is all it takes for these delightful pots to chill and set perfectly. No more overnight waits!
Beyond the Basic: Customizations and Serving Suggestions
While the classic chocolate pots de creme stovetop method no water bath is a triumph on its own, it also serves as a fantastic canvas for creativity. Here are some ideas to elevate your dessert:
- Chocolate Varieties: Experiment with different cocoa percentages. A rich dark chocolate (70%+) offers intensity, while milk chocolate provides a sweeter, creamier profile. A blend can offer the best of both worlds.
- Flavor Enhancers: A pinch of sea salt enhances the chocolate flavor beautifully. A splash of Grand Marnier (as suggested in the reference), Kahlúa, or espresso powder can add depth. For a warm spice note, a hint of cinnamon or chili powder can be intriguing.
- Garnishes Galore: The perfect accompaniment is often a dollop of freshly whipped cream, perhaps lightly sweetened with vanilla or a touch of liquor. Other delightful toppings include chocolate shavings, fresh berries (raspberries, strawberries), a sprig of mint, or a sprinkle of flaky sea salt for a sophisticated touch.
- Serving Vessels: While traditional ramekins are lovely, consider mini Mason jars for a rustic charm, or elegant espresso cups for a petite, refined serving.
- Make-Ahead Mastery: These pots de crème are an ideal make-ahead dessert. Prepare them up to 2-3 days in advance and store them, covered, in the refrigerator. This frees up precious time on the day of your event, allowing you to relax and enjoy your guests.
Conclusion
Gone are the days when exquisite French desserts were reserved for the most experienced chefs or those with ample time on their hands. The chocolate pots de creme stovetop method no water bath has democratized decadence, offering a remarkably simple yet utterly luxurious dessert that comes together in about 60 minutes. From its rich, velvety texture to its intense chocolate flavor, this stovetop rendition proves that sometimes, the easiest path is also the most delicious.
So, the next time a craving for something truly special strikes, ditch the water bath, embrace your stovetop, and prepare to indulge in the silkiest, most satisfying chocolate pots de crème you’ve ever tasted. Your taste buds—and your schedule—will thank you.
